BreezySplits - User Guide
Welcome to BreezySplits! This guide will help you navigate and make the most of the app to easily track and split travel expenses with your companions.
1. Introduction
1.1 Overview & Purpose
BreezySplits is designed to simplify the often-tedious task of managing shared expenses during trips. Whether you're on vacation with friends, a business trip with colleagues, or a road trip with family, BreezySplits provides a straightforward, offline-capable tool to:
- Track who paid for what.
- Split costs fairly among participants (equally or by specific amounts).
- Calculate who owes whom.
- Minimize the number of payments needed to settle debts.
The app focuses on clarity and ease of use, ensuring you spend less time crunching numbers and more time enjoying your travels.
1.2 Intended Audience
This app is perfect for:
- Groups of friends traveling together.
- Families managing shared vacation costs.
- Colleagues sharing expenses on business trips.
- Anyone who needs a simple way to track and split costs within a group for a specific event or trip.
2. Downloading & Installing the App
2.1 App Store Instructions
- Open the App Store on your iPhone.
- Tap the Search tab (magnifying glass icon) at the bottom right.
- Type "BreezySplits" into the search bar and tap Search.
- Locate the BreezySplits app icon in the search results.
- Tap the Get button (or the cloud icon if you've downloaded it before).
- Authenticate with Face ID, Touch ID, or your Apple ID password if prompted.
- The app will download and install automatically. You can find it on your Home Screen once finished.
2.2 System Requirements
- iOS Version: Requires iOS 15.0 or later.
- Device: Compatible with iPhone.
3. Getting Started
3.1 Account Creation & Login
BreezySplits is designed for simplicity and privacy. No account creation or login is required. All your trip data is stored securely and privately on your device. You can start using the app immediately after installation.
3.2 App Layout & Navigation
The app uses a standard tab bar interface at the bottom of the screen for easy navigation between its main sections:

- My Trips: (Airplane icon) This is where you start. Create new trips and select the trip you want to view or manage.
- Expenses: (Dollar sign icon) View, add, and manage expenses for the currently selected trip. This tab is only active when a trip is selected.
- Settle Up: (Arrows icon) See who owes whom and the recommended settlement payments for the currently selected trip. This tab is only active when a trip is selected.
- Trip Details: (Info icon) View and manage members and currencies for the currently selected trip. This tab is only active when a trip is selected.
- Settings: (Gear icon) Adjust app settings like appearance and manage app data.
A Selected Trip Header may appear at the top of the Expenses, Settle Up, and Trip Details screens, reminding you which trip you are currently viewing.
4. Feature Overview
4.1 List of Key Features
- Trip Creation & Management: Organize expenses by trip, including dates, location (country), and primary currency.
- Member Management: Add companions to each trip.
- Expense Tracking: Log expenses with details like amount, title, category, date, and who paid.
- Flexible Splitting: Split expenses equally among selected members or specify exact amounts for each person.
- Multi-Payer Support: Record expenses paid by multiple people.
- Payback Recording: Log direct payments between members (e.g., settling a specific debt).
- Balance Calculation: Automatically calculates how much each member owes or is owed within the trip.
- Settlement View: Provides a clear summary of debts and suggests optimized payments to settle up efficiently.
- Multi-Currency Support: Add multiple currencies to a trip and record expenses in their original currency. Balances can be viewed per currency. (Note: Currency conversion uses static rates and may not reflect real-time values).
- Offline Functionality: Works entirely offline; all data is stored locally on your device.
- Appearance Settings: Choose between Light, Dark, or system Auto theme.
4.2 Feature-by-Feature Guide
4.2.1 Creating a New Trip
What it does: Sets up a new container to organize expenses and members for a specific trip or event.
How to access it: Go to the My Trips tab and tap the + (plus) icon in the top-right corner.
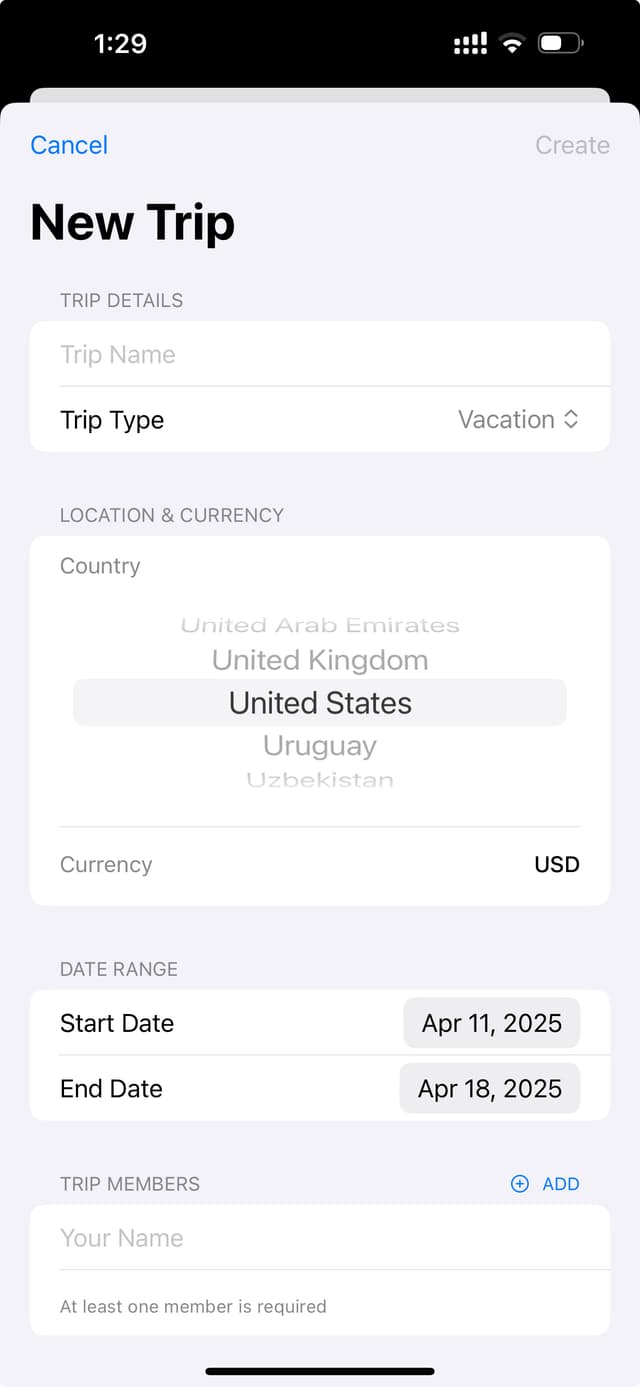
How to use it:
- Fill in the Trip Name.
- Select a Trip Type (e.g., Vacation, Business).
- Choose the Country for the trip. The primary Currency will often update automatically based on the country, but you can verify it.
- Set the Start Date and End Date for the trip.
- Under Trip Members, enter your name in the first field.
- Tap the Add button (plus icon) next to "Trip Members" to add more input fields for your companions.
- Enter the names of all people participating in the trip. You must add at least one member (yourself).
- Tap Create in the top-right corner.
Tips & Best Practices: Use descriptive names for trips. Add all members who will be sharing expenses before you start adding transactions.
4.2.2 Selecting a Trip
What it does: Makes a trip active so you can view its expenses, balances, and details.
How to access it: Go to the My Trips tab.
How to use it: Simply tap on the card representing the trip you want to view. The selected trip will be highlighted (often with a green border or checkmark), and the other tabs (Expenses, Settle Up, Trip Details) will now show data for this trip. The Selected Trip Header will appear at the top.
Tips & Best Practices: Always make sure the correct trip is selected before adding expenses or viewing settlement details.
4.2.3 Adding Members to a Trip
What it does: Adds people to a selected trip so they can be included in expense splits.
How to access it:
- Select the desired trip from the My Trips tab.
- Go to the Trip Details tab.
- Tap the Add button (person with plus icon) in the "Trip Members" section.
How to use it:
- Enter the member's Name.
- Tap Add Member.
Tips & Best Practices: Add members before you start adding complex expenses involving them.
4.2.4 Editing Trip Details or Members
What it does: Allows you to change trip information (name, dates, currency, etc.) or member names.
How to access it:
- Select the desired trip from the My Trips tab.
- Go to the Trip Details tab.
- To edit the trip: Tap Edit in the top-right corner.
- To edit a member: Tap directly on the member's row in the list (or use the context menu by long-pressing).
How to use it:
- Editing Trip: Modify the fields in the "Edit Trip" screen and tap Save Changes.
- Editing Member: Modify the name in the "Edit Member" screen and tap Save Changes.
Tips & Best Practices: Keep member names unique within a trip for clarity.
4.2.5 Managing Supported Currencies
What it does: Allows you to add additional currencies you expect to use during the trip, besides the primary one. Expenses can then be recorded in these specific currencies.
How to access it:
- Select the desired trip from the My Trips tab.
- Go to the Trip Details tab.
- In the "Supported Currencies" section, tap the Add button (plus icon).
How to use it:
- Search or scroll to find the currency you want to add.
- Tap the currency row. It will be added to the list.
- Tap Done.
- You can remove a currency (except the primary one) by tapping the trash icon next to it.
- You can set a different currency as the primary one by tapping "Set Primary". The primary currency is used for displaying overall balances when multiple currencies are involved.
Tips & Best Practices: Add currencies you anticipate using before you encounter expenses in those currencies.
4.2.6 Adding an Expense
What it does: Records a cost incurred during the trip and specifies how it should be split.
How to access it:
- Select the desired trip from the My Trips tab.
- Go to the Expenses tab.
- Tap the
+(plus) icon in the top-right corner and choose Add Expense.
How to use it:
- Enter the Amount of the expense.
- Select the Currency the expense was paid in (defaults to the trip's primary currency, but you can choose any supported currency).
- Enter a Title (e.g., "Dinner", "Train Tickets").
- Optionally, add a Description.
- Select the Date the expense occurred.
- Choose a Category.
- Paid By: Select the member(s) who paid.
- Tap a member's row to select/deselect them.
- If multiple members paid, you can optionally toggle Specify Amounts to enter exactly how much each payer contributed. If you don't specify, the app assumes they paid equal portions of the total amount. Use "Distribute Payment Equally" if needed. Ensure the payer amounts add up correctly to the total expense amount.
- Split Between: Select the members who should share the cost.
- Choose the Split Type:
- Equal: The cost is divided equally among all selected members.
- Exact Amounts: You must manually enter the specific amount each selected member is responsible for. Use the "Distribute Equally" button as a starting point if needed. Ensure the amounts add up correctly to the total expense amount.
- Tap members' rows to include/exclude them from the split.
- Choose the Split Type:
- Review the Expense Visualization (if shown) to confirm the payment flow.
- Tap Save Transaction.

Tips & Best Practices: Be precise with amounts. Double-check who paid and who should be included in the split. Use the "Description" field for notes like location or specific items purchased.
4.2.7 Adding a Payback
What it does: Records a direct payment made from one member to another, typically used to settle debts outside of specific expenses.
How to access it:
- Select the desired trip from the My Trips tab.
- Go to the Expenses tab.
- Tap the
+(plus) icon in the top-right corner and choose Pay Back Member.
How to use it:
- Enter the Amount being paid back.
- Select the Currency of the payment.
- Optionally, change the Title (defaults to "Payback") and add a Description.
- Select the Date of the payment.
- Under Paid By (Sender), select the member who is making the payment.
- Under Paid To (Receiver), select the member who is receiving the payment.
- Tap Save Payment.
Tips & Best Practices: Use this when a member directly gives money to another to settle up, rather than linking it to a specific shared expense.
4.2.8 Viewing Expenses
What it does: Shows a list of all recorded expenses and paybacks for the selected trip.
How to access it:
- Select the desired trip from the My Trips tab.
- Go to the Expenses tab.
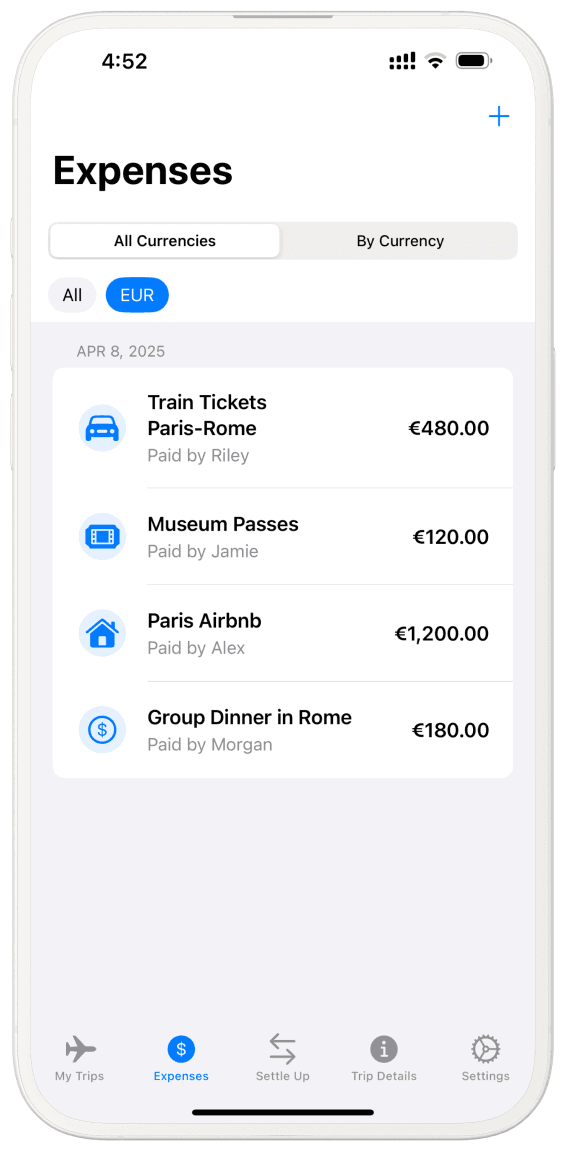
How to use it:
- The list is typically grouped by date (most recent first).
- You can switch the View Mode at the top to see expenses Consolidated (all currencies, potentially filtered) or By Currency.
- In Consolidated mode, you can tap currency Filter Chips (e.g., "All", "USD", "EUR") to show only transactions in that currency.
- Tap on any transaction row to view its details.
- Long-press (or swipe, depending on iOS version/UI) on a transaction row for options like viewing details or deleting.
Tips & Best Practices: Regularly review the expenses list to ensure accuracy.
4.2.9 Settling Up Debts
What it does: Calculates who owes money to whom based on all recorded expenses and paybacks, and suggests optimized payments to settle all debts efficiently.
How to access it:
- Select the desired trip from the My Trips tab.
- Go to the Settle Up tab.
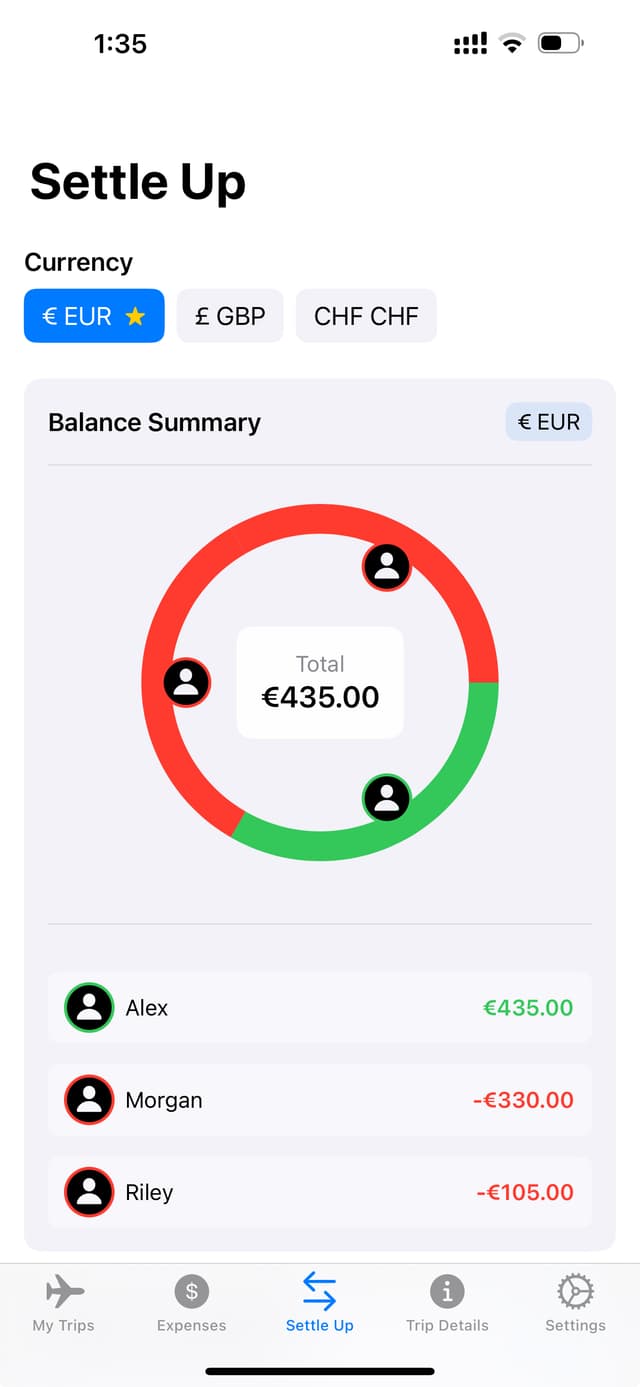
How to use it:
- Select Currency: Choose the currency for which you want to view balances and settlements using the horizontal currency picker at the top.
- Balance Summary/Visualization: Review the cards showing each member's net balance (positive means they are owed money, negative means they owe money).
- Debts Card: This section shows the calculated payments needed.
- Each row indicates who (
From) should pay whom (To) and theAmount. - Tap on a debt row to see a detailed breakdown of the transactions contributing to that specific debt relationship.
- Each row indicates who (
4.2.10 Changing App Theme
What it does: Allows you to switch between Light Mode, Dark Mode, or have the app automatically follow your system's appearance setting.
How to access it: Go to the Settings tab.
How to use it: In the "Appearance" section, tap the Theme row and select Auto, Light, or Dark. The app's appearance will update immediately.

4.2.11 Resetting App Data
What it does: Permanently deletes all trips, members, and transactions stored within the app. This cannot be undone.
How to access it: Go to the Settings tab.
How to use it:
- In the "Storage" section, tap the Reset All Data button.
- Read the confirmation message carefully.
- Tap Reset to confirm the deletion, or Cancel to abort.
Tips & Best Practices: Use this option with extreme caution. It's useful if you want to start completely fresh or clear sensitive data before uninstalling. There is no backup or recovery option within the app itself.
5. Common Tasks & Scenarios
5.1 Scenario: Starting a New Trip
- Go to the My Trips tab.
- Tap
+. - Enter trip details (Name: "Weekend Getaway", Type: Vacation, Country: USA, Dates: etc.).
- Add yourself and your friends ("Alice", "Bob") as members.
- Tap Create.
- The "Weekend Getaway" trip is now created and automatically selected.
5.2 Scenario: Adding a Shared Dinner Expense
- Ensure "Weekend Getaway" is selected (check header or My Trips tab).
- Go to the Expenses tab.
- Tap
+and select Add Expense. - Enter Amount:
60, Currency:USD, Title: "Dinner Night 1". - Select Category: "Food".
- Paid By: Tap your name.
- Split Between: Select "Equal" split type. Tap your name, Alice, and Bob (ensure all three are checked).
- Tap Save Transaction. (The app calculates that Alice and Bob each owe you $20).
5.3 Scenario: Adding an Expense Paid by Multiple People (e.g., Groceries)
- Ensure "Weekend Getaway" is selected.
- Go to the Expenses tab.
- Tap
+and select Add Expense. - Enter Amount:
100, Currency:USD, Title: "Groceries". - Category: "Food".
- Paid By: Tap Alice and Bob.
- Toggle Specify Amounts ON.
- Enter
70next to Alice's name and30next to Bob's name. (Ensure amounts add up to $100). - Split Between: Select "Equal" split type. Tap your name, Alice, and Bob.
- Tap Save Transaction.
5.4 Scenario: Settling Debts at the End of the Trip
- Ensure "Weekend Getaway" is selected.
- Go to the Settle Up tab.
- Choose the currency (e.g.,
USD). - Review the Balance Summary to see who is owed money (positive balance) and who owes (negative balance).
- Look at the Debts card to see the suggested payments (e.g., "Bob pays Alice $10").
- Members make the suggested payments to each other outside the app.
- (Optional): You can record these payments using the "Pay Back Member" feature on the Expenses tab if you want a record within the app.
6. Settings & Personalization
6.1 Profile Settings
Since BreezySplits doesn't have user accounts, there are no profile settings to manage (like email or password). Your name is added on a per-trip basis as a member.
6.2 Customization Options
Theme: Navigate to the Settings tab. Under "Appearance", tap "Theme" to choose between:
- Auto: Matches your device's system appearance (Light/Dark).
- Light: Forces the app to always use a light appearance.
- Dark: Forces the app to always use a dark appearance.
7. Security & Privacy
7.1 Data Protection Measures
- Offline Storage: All your trip data (expenses, members, etc.) is stored only on your device using Apple's secure Core Data framework.
- No Cloud Sync: Your data is not sent to any external servers or cloud services.
- No Accounts: The lack of user accounts means there's no personal login information stored or transmitted.
7.2 User Privacy Controls
- Permissions: The app does not require access to sensitive permissions like Location, Contacts, or Photos.
- Data Management: You have full control over your data. You can delete individual transactions, members, or entire trips. You can also wipe all app data via the Reset All Data option in Settings.
8. Troubleshooting & FAQs
8.1 Common Issues & Solutions
- Issue: Balances seem incorrect.
Solution: Double-check all entered expense amounts, who paid, and who was included in each split for accuracy. Ensure paybacks were recorded correctly. Verify the correct currency was selected for each transaction. - Issue: Cannot select Expenses/Settle Up/Trip Details tabs.
Solution: Go to the My Trips tab and tap on a trip to select it first. These tabs only show content for the active trip. - Issue: App storage size is large (viewable in Settings).
Solution: This can happen with many trips and transactions over time. Currently, there's no selective archiving. You may need to delete old, fully settled trips manually if storage becomes a concern. The Reset All Data option clears everything. - Issue: Currency conversion seems off or outdated.
Solution: The app uses static, non-real-time exchange rates. These are for approximation only. For precise settlement involving multiple currencies, agree on exchange rates with your group externally or settle debts within each currency separately.
8.2 Frequently Asked Questions
Can I add photos of receipts?
Not right now. While the app was built with the idea of adding receipt photos later, the feature to actually upload or see them isn't available in this version.
How are debts simplified in the 'Settle Up' tab?
The app figures out the simplest way for everyone to get paid back. Instead of lots of small payments, it tells you the fewest payments needed to settle everything. For instance, if you owe Alice $10 and Alice owes Bob $10, the app might just tell you to pay Bob $10 directly.
What happens if I delete a member?
Deleting someone removes them from the trip. Be careful, as this can mess up past expense calculations and who owes what. It's best not to delete someone unless you added them by accident right at the start, before recording any costs involving them.
What happens if I delete a trip?
Deleting a trip completely erases it, along with everyone in it and all the recorded expenses and payments. This action is permanent and cannot be reversed, so be sure before you delete!
9. Updates & New Features
9.1 Release Notes
- Version 1.0: Initial release with core features for trip creation, member management, expense tracking (equal, exact amount, multi-payer splits), payback recording, multi-currency support (static rates), balance calculation, and settlement optimization.
9.2 How to Update
- Open the App Store.
- Tap your Profile icon in the top-right corner.
- Scroll down to see pending updates.
- If BreezySplits has an update, tap the Update button next to it. You can also tap Update All.
10. Support & Contact Information
10.1 Getting Help
Need more help? Please visit our Support Center for contact information and answers to common questions.
10.2 Feedback & Feature Requests
If the project is hosted publicly (e.g., on GitHub), you may be able to submit feedback or report issues through the platform's "Issues" tracker. Otherwise, check the Support Center for ways to contact us.